
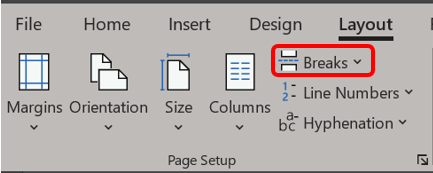
Word provides many break options with the most frequently used being the Page Break. If you’ve never used a page or the other type of break options, this post will provide information on each. First, to find the break options available go to the Layout ribbon, select Breaks from the Page Setup group.
A dropdown menu with a list of all seven (7) types of page and section breaks will appear.


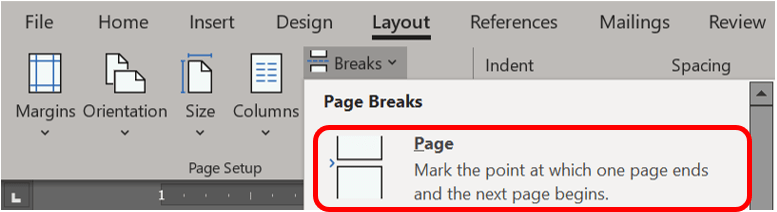
A page break starts your cursor at the top of the next page. All formatting will be kept the same from your original page to your new one. Do not keep hitting Return until you reach a new page. See Bad Code or How to Make Everyone’s Life Including Your Own More Difficult for why you should use breaks instead.
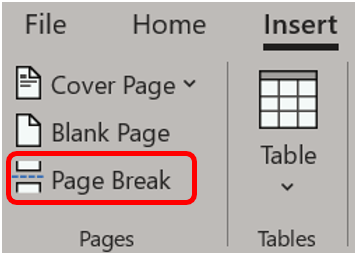
There are two ways to insert a Page Break.
1. From the Insert ribbon in the Pages group, select Page Break.
2. On the Layout ribbon, select Breaks from the Page Setup group. Then from the dropdown menu, click Page.
Other breaks in this menu are as follows.
Column Breaks
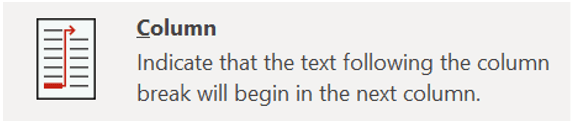
You know when you’re writing in columns, and you just want that last line you typed to move to the next column? You could press Enter a bunch, but then your formatting will be messed up if you edit your text later, and you’ll be deleting returns while annoying yourself. A better way is to insert a Column Break. This will move the cursor to the next column to the right, leaving your previous text in the first column. If you go back and add more text to the first column, it’ll populate the same column unless you add so much that you overflow the column.
Text Wrapping

You’ve seen text wrap around an image. Obviously. You’re looking at it now. But say your text doesn’t reach the bottom of the image and you don’t want to start the next paragraph with only one line. You could hit return and have that extra paragraph break floating in your document or you could select the text beside the picture and choose this Text Wrapping option. This will allow you to keep the selected text together with consistent formatting and will flow the rest of the document around this section.

Want to switch from two-column to single-column text? Want to apply a new font scheme to only the cover page or use a different footer halfway through your document? Want to switch from portrait to landscape? Use Section Breaks. Now you can format a full document with cover, contents, and references, all with their own unique formatting but saved in the same document. Unlike the standard page break, the Next Page section break option moves you to the next page and gives you entirely separate formatting in the new section. Alternately, the Continuous break does the same thing without putting you on a new page. The Even and Odd Page breaks allow you to insert a section break and go to the next even or odd page, respectively, so you can easily format your documents for left and right pages in a book. Section Breaks influence headers and footers which I’ll cover in my next post.
Deleting a Page Break
You can delete any manual page break that you insert by selecting the page break and selecting delete or backspace.
If you’re having trouble finding breaks to remove see this post.
