First a bit of history and no, you’re not about to get a lesson in programing languages—well you sort of are. Ok for clarity you are not about to see a bunch of jibberish that only people who live in their mother’s basement understand. Show/Hide and Reveal Codes are tools to help provide you visuals on what’s going on in your document. Let’s travel back to the bad old days of hair bands and neon as a clothing choice to understand. In the screenshot below, you’ll see a document where the top half of the screen is repeated in the bottom half of the screen but with random bits of text between words.

First, you may notice all code is in English. You may also see a line that starts with “[Center]” then has text. This is telling the computer to center that line. Further on, you’ll see a word surrounded by the command “[UND]” which tells the computer to start underlining, and then the command “[und],” which means to stop underlining. This is one thing I miss about the bad old days. You could easily find your problem code. If these codes look at all familiar, they are the basis for HTML and Java.
If you use the program WordPerfect, a competitor to Word, you still have this option. The screenshot above is from WordPerfect. They were known for their divided screen. Word never embraced reveal codes in the same manner, but you can see the code in a document in a fashion. Using our keyboard shortcuts, press Shift+F1. A task pane should appear to the right, labeled Reveal Formatting. From here, you’ll see general information about the format of the document based on where your cursor is at that moment. Microsoft has made this in a way that lacks general use (you can find much of the information on the Home ribbon) and disappoints if you’ve used WordPerfect.
So, what’s their alternative to reveal codes? Word provides the Show/Hide option on the Home ribbon under the Paragraph section. It’s the little paragraph symbol. Click it once to toggle. (US Keyboard: Ctrl+Shift+8/EU Keyboard Ctrl+*)
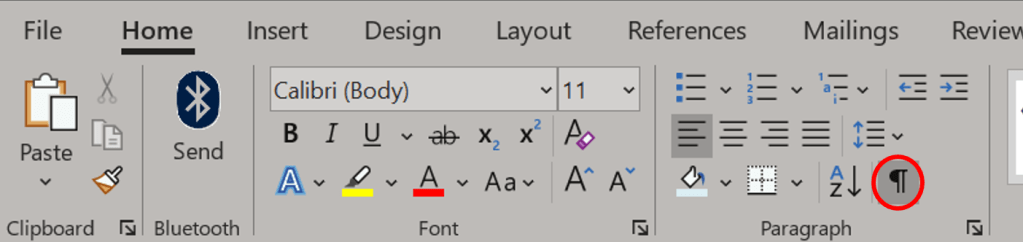
The button will darken, indicating that it’s toggled to Show. Your document will now be covered in dots where spaces once were, paragraph marks will display at the end of lines, and arrows will display where tabs were. These are printer marks, also called editing or formatting marks. Don’t worry, these marks do not print. They only appear on screen for your reference. You may prefer to work without seeing them (Hide); however, you should be familiar with them and their meaning.
If you choose to hide nonprinting characters, know that displaying them can be helpful when you’re working through final formatting of your document. If pages do not break as desired, line/character spacing appears off, the automatic number is sometimes bold and sometimes not bold, a random blank page keeps appearing, your footers change format halfway through and then suddenly back again, or any number of formatting frustrations. Each of these issues is much, much easier to diagnose when you use Show/Hide to view the “code” and see the problem.
Sow what do all of these printer marks mean?
Paragraph Marks or Hard Returns 
The paragraph mark or pilcrow (¶) represents a paragraph break or hard return. You will see one at the end of each paragraph, not each line. If you don’t see it, you’re either not at the end or you have problems. Ordinarily, you should not see one anywhere else. Sometimes, you’ll see a series of paragraph marks or you’ll want to see if someone added returns rather than updating their line spacing.
Style Separator 
This is basically the same as hidden paragraph marks except they include style information. It may appear thicker than another similar mark, which means it’s holding information to bold the text or to be a color other than black, which means it wants to turn text into whatever that color is.
Spaces ∙
A∙small∙dot∙between∙characters∙represents∙a∙space. If you have text you want to lock together but the space falls at the end of a paragraph, you can press Ctrl + Shift + Spacebar to create a space that serves as an anchor. This will appear as the degree symbol ° when Show/Hide is toggled to Show.
Line Breaks or soft returns

A right-angle arrow pointing to the left represents a line break (soft return), inserted with Shift + Enter. You can use a line break to start a new line without starting a new paragraph. This means that the spacing at the end of your paragraph will not start until the hard return is entered.
Tab Characters

The right-pointing arrow indicates a tab. In a properly formatted document, you should not see more than one of these in a row.
Page and Section Breaks
The names here give away the functions. You can find all break options on the Layout ribbon in the Page Setup section. Select the drop-down option for Breaks.
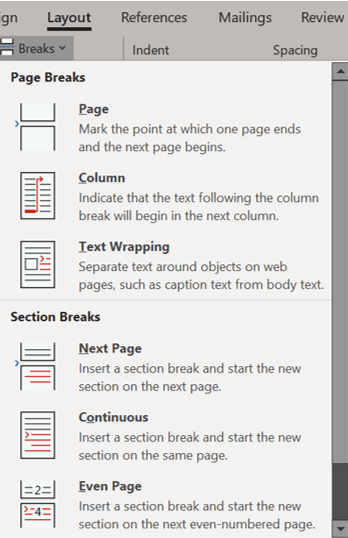
Below is a sampling of what some of these breaks are:

These breaks can hide at the end of a paragraph so if you suddenly have a large blank space, it may be due to a hidden break. Tap Enter at the end of a suspected line, hiding the break to reveal or Delete to remove. I’ll further detail Breaks in another post and relink here when it is posted.
Tip: To insert a regular page break, press Ctrl+Enter.
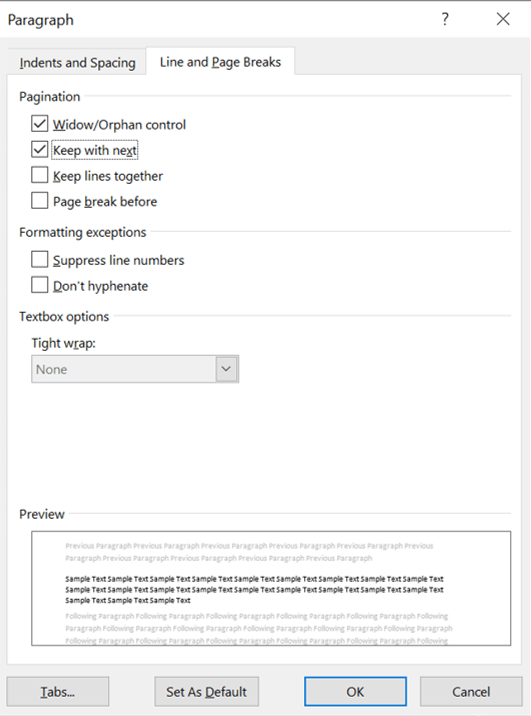
Keep with next ■
When a small, square, black bullet appears in the left margin next to the top line of a paragraph, it indicates that the paragraph is formatted to either “Keep with next,” “Keep lines together,” “Page break before,” or “Suppress line numbers.”

The listed setting options are found on the Home ribbon in the Paragraph dialog box, which is opened by clicking the box with a diagonal arrow. Move to the tab titled, Line and Page Breaks, and choose the desired option.
Cell markers ¤
The universal monetary symbol appears at the end of every cell in a table and functions the same as a style separator or paragraph mark in that its appearance will change based on the text in the cell. It will grow smaller as the font size decreases and increase in thickness if made bold.
Anchors

The boat anchor attached to objects (eg., shapes, pictures, etc.) appears sometimes on floating objects when you click the object. Anchors indicate the specific paragraph with which an object is associated. This is important for object positioning especially when the paragraph the object is anchored to is spread over a page break.
Field codes
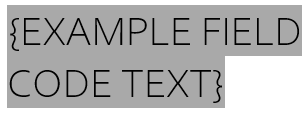
Field codes are grayed-out text that serve as a set of instructions to Word to insert text, graphics, page numbers, and other items into a document automatically. For example, a DATE field would insert the current date. You can have Field Codes that are part of Quick Parts, Autotext (e.g., page numbers), or Tables of Contents and Figures. They are useful for autogenerating text or pulling from other sources.
Ordinarily, when viewing in Print Layout, Word will display the result of a field code; however, pressing Alt+F9, or when hovering over a field code, click the right mouse button and select Toggle Field Codes on the shortcut menu.
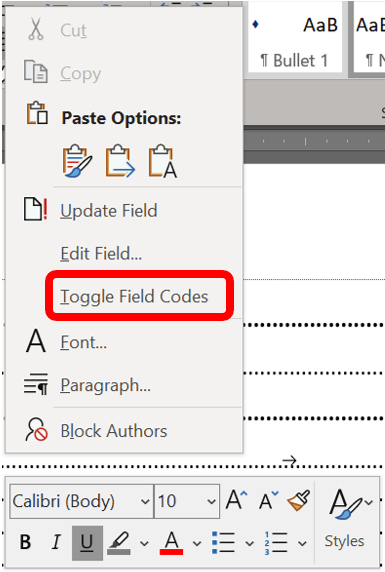
The application will switch from results to the code itself enclosed in curly braces. Field codes, depending on the type, do not necessarily switch from results to code when Show/Hide is switched to Show. However, printer marks that display in Show will be switched on when Toggle Field Codes is switched to display code.
Index Entries

If you have a massive document, like say a book, which needs an appendix for readers to easily look up sections or references other than chapter headings, you will need to point the program to those references. The computer doesn’t figure it out on its own… yet. Those entries are called Index Entries and only appear with squiggly brackets when Show/Hide is toggled to Show.

Bear in mind if you’re working on Page Breaks you’ll need need to toggle back to Hide as these marks increase the page count you see but not the printed version.
Bookmarks
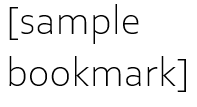
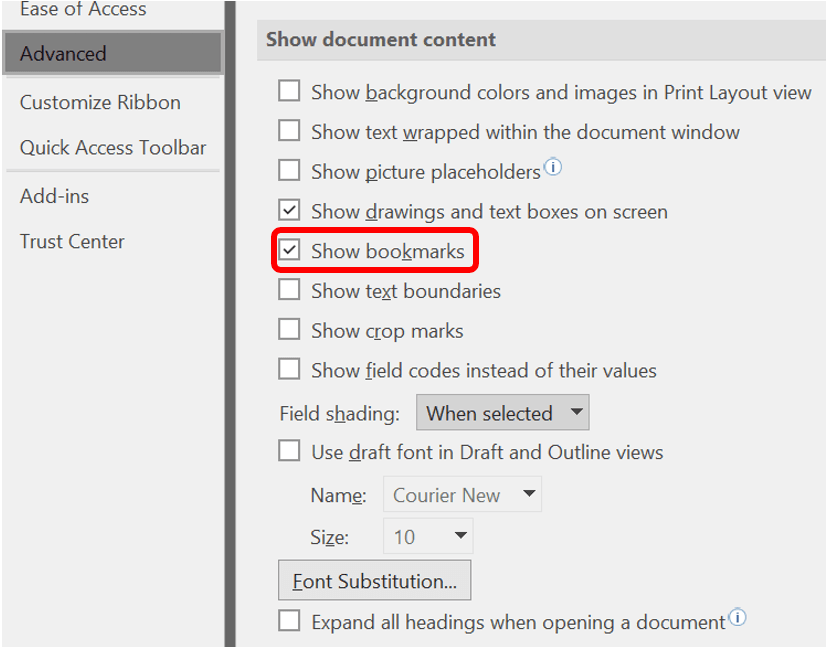
Bookmarks in Word identify places in your document you want to easily refer to in the future. Bookmarked locations/text allow you to jump to the point in your document without scrolling. If you’ve ever used bookmarks in a PDF, it has the same functionality. (This works in Outlook too!) You can insert as many bookmarks as you want in your document, but you’ll need to give each one a unique name so you can easily distinguish them. Bookmarked text will be denoted by square brackets [] around text. If the Show/Hide button does not reveal bookmarks, click the File tab. Then choose Options. A pop-up menu will appear. In the left pane of that window, click Advanced and scroll to the Show document content section where you’ll check Show bookmarks.
Hidden Text
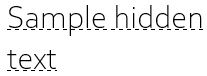
Did you know your Word document could include hidden messages? Word allows you to hide text so when you read or print your document, that text acts like it isn’t really there. Think of it as invisible ink. It only shows up if you know the secret. Sounds silly, right? Possibly dangerous. So why even have it as an option? Maybe you’re creating a document for customers and, rather than create a second document to track and update, you want an internal version with notes about discussion points. Hidden text allows you to have one document to maintain to serve both audiences.
